
System Design Interview: How to Build Low‑Latency Live Streaming (What Actually Matters)

bugfree.ai is an advanced AI-powered platform designed to help software engineers master system design and behavioral interviews. Whether you’re preparing for your first interview or aiming to elevate your skills, bugfree.ai provides a robust toolkit tailored to your needs. Key Features:
150+ system design questions: Master challenges across all difficulty levels and problem types, including 30+ object-oriented design and 20+ machine learning design problems. Targeted practice: Sharpen your skills with focused exercises tailored to real-world interview scenarios. In-depth feedback: Get instant, detailed evaluations to refine your approach and level up your solutions. Expert guidance: Dive deep into walkthroughs of all system design solutions like design Twitter, TinyURL, and task schedulers. Learning materials: Access comprehensive guides, cheat sheets, and tutorials to deepen your understanding of system design concepts, from beginner to advanced. AI-powered mock interview: Practice in a realistic interview setting with AI-driven feedback to identify your strengths and areas for improvement.
bugfree.ai goes beyond traditional interview prep tools by combining a vast question library, detailed feedback, and interactive AI simulations. It’s the perfect platform to build confidence, hone your skills, and stand out in today’s competitive job market. Suitable for:
New graduates looking to crack their first system design interview. Experienced engineers seeking advanced practice and fine-tuning of skills. Career changers transitioning into technical roles with a need for structured learning and preparation.
System Design Interview: How to Build Low‑Latency Live Streaming (What Actually Matters)
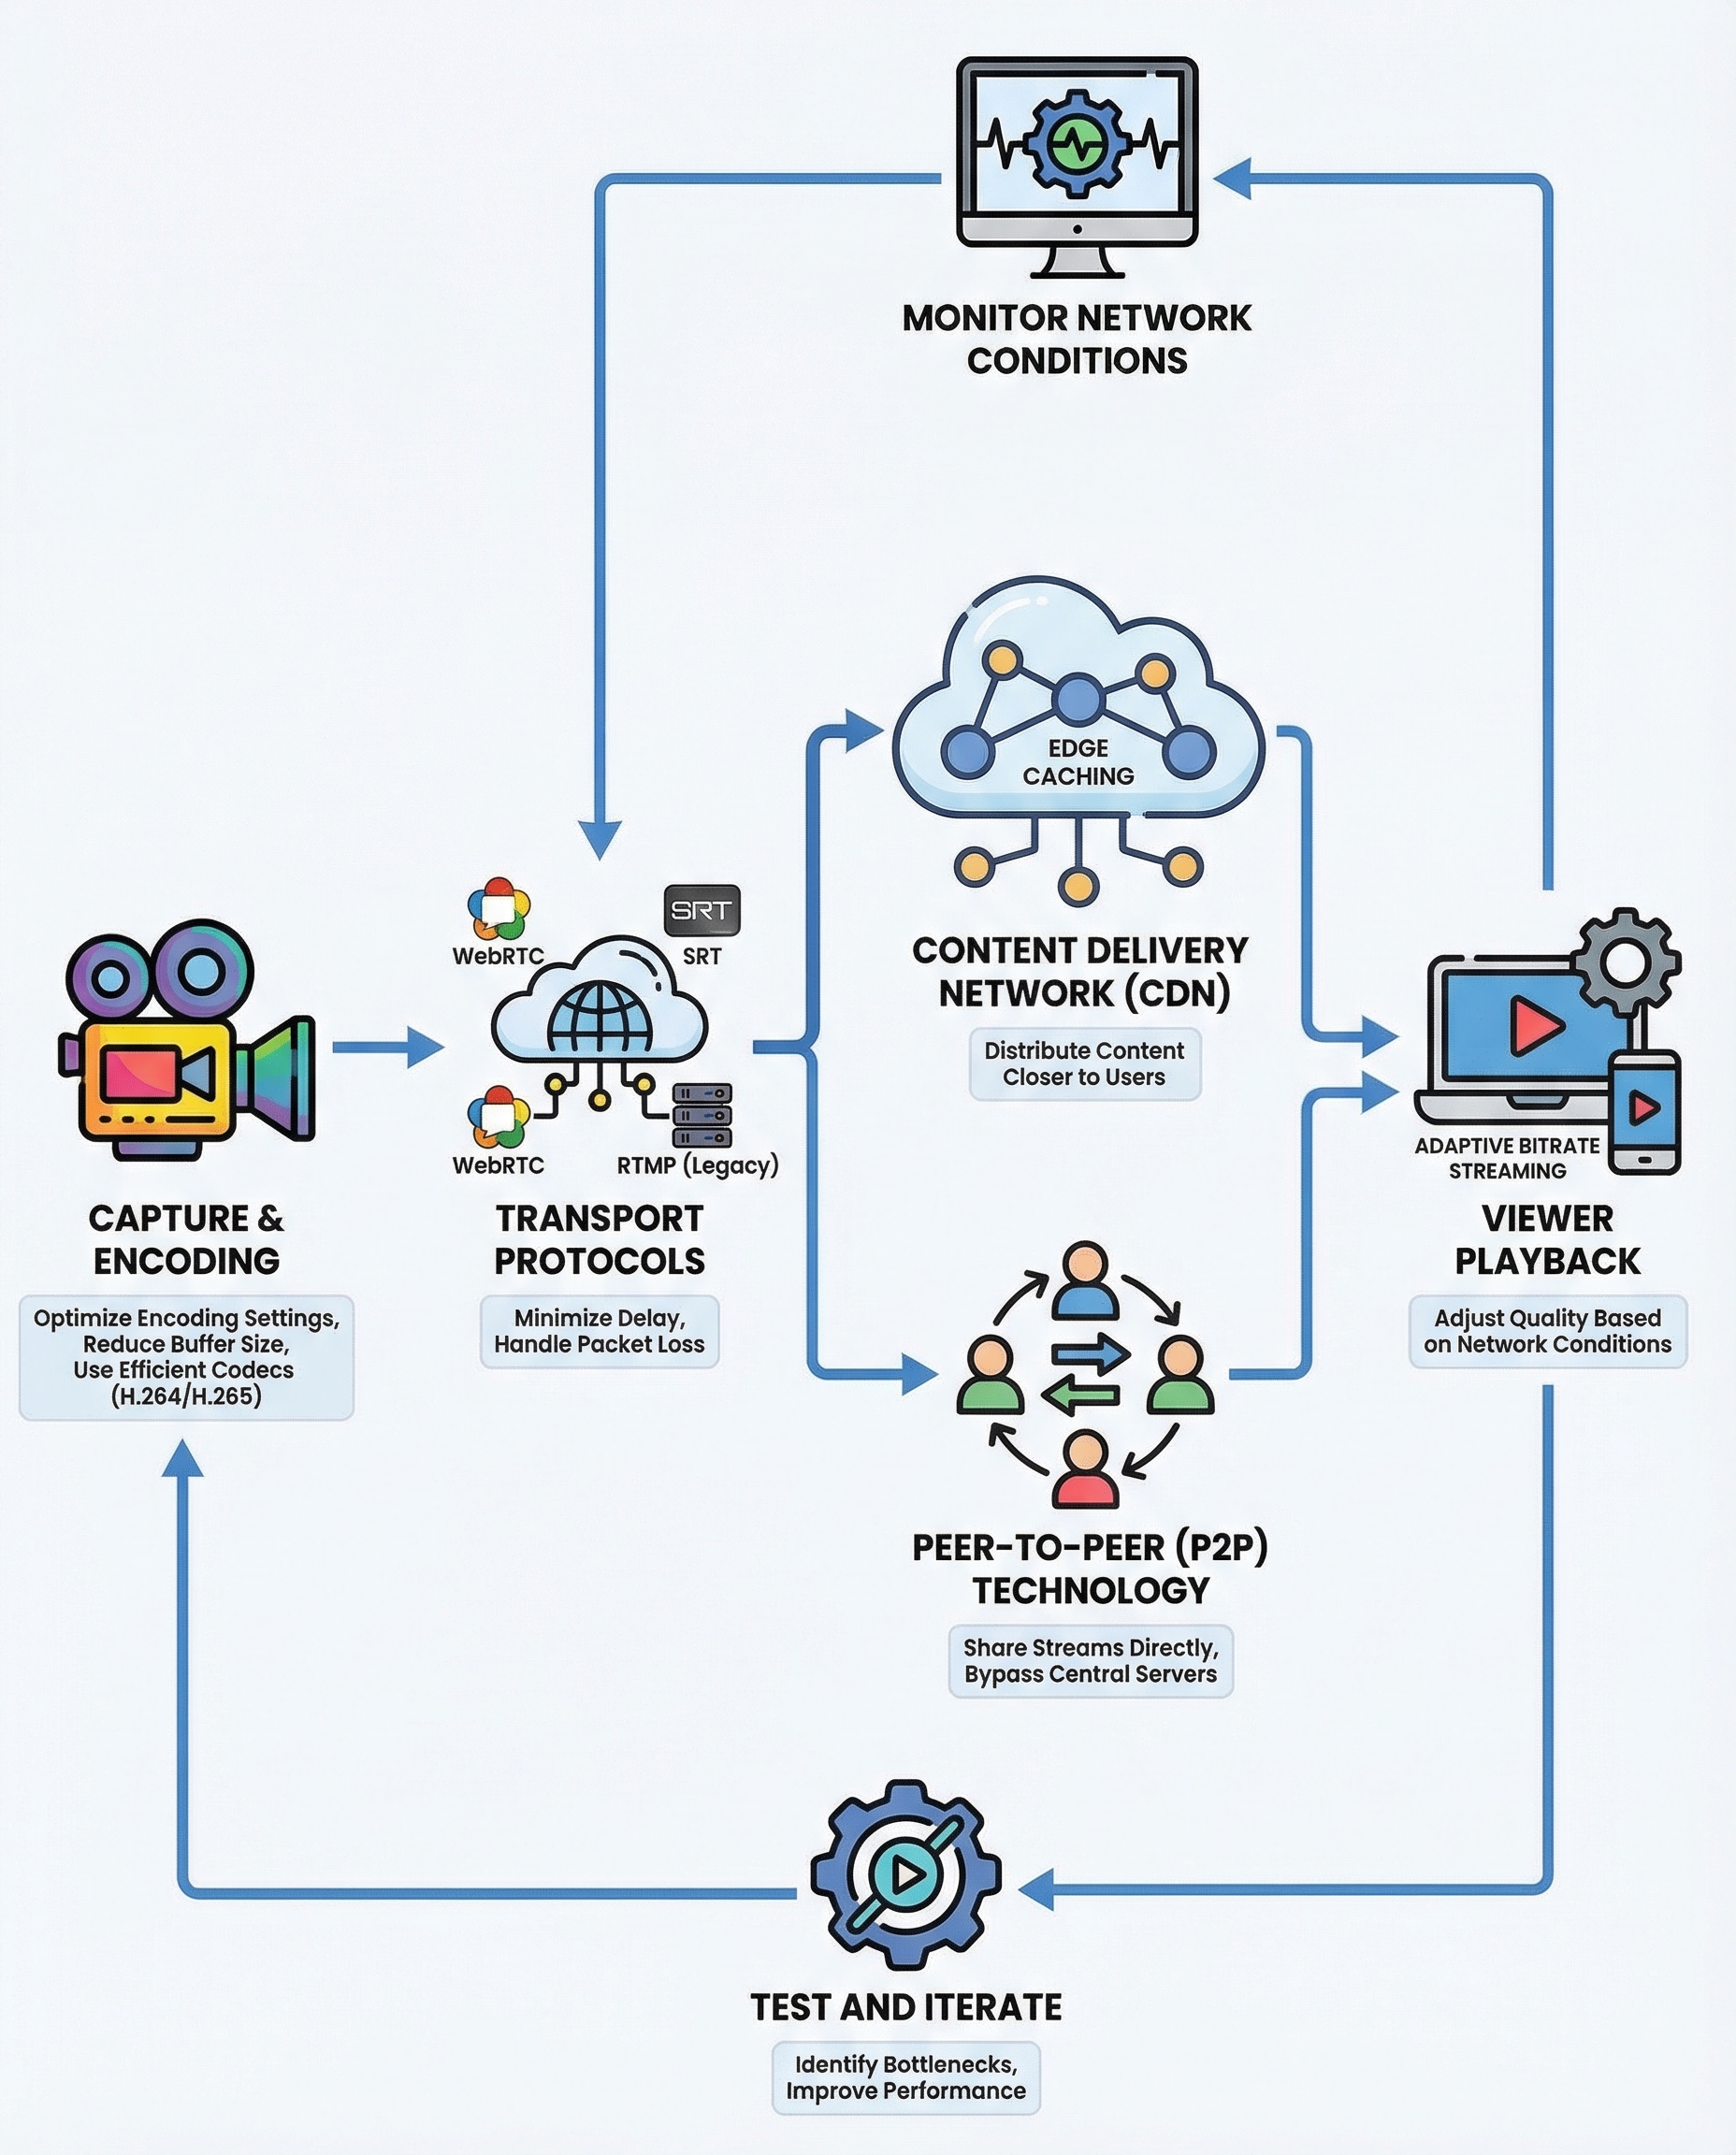
Low latency in live streaming means minimizing the delay from camera capture to viewer playback — often called glass‑to‑glass latency. In interviews you should (1) explain where latency is introduced, (2) show the levers you can pull to reduce it, and (3) describe measurable tradeoffs.
Below is a concise, interview‑friendly approach that highlights the things that actually matter.
Where latency is introduced
Typical glass‑to‑glass pipeline and common sources of delay:
- Capture & encode: camera capture, frame batching, encoder latency (lookahead, CPU/GPU latency).
- Transport from source to origin: network RTT, packet loss, retransmissions.
- Ingest & server processing: transmuxing, packaging, origin processing (e.g., segmenting for HLS/DASH).
- CDN / edge propagation: cache warm‑up, round trips to the edge.
- Player/network buffers & decoding: jitter buffer, rebuffering, decoder latency, client buffering strategy.
If asked, sketch this pipeline quickly and attach approximate relative delays. Then say: “We reduce latency by targeting the biggest contributors first.”
The 4 levers (what to focus on)
1) Encode fast
- Choose efficient codecs and low‑latency presets: H.264/H.265 are common; AV1 may be useful but has higher encode latency today.
- Use low‑latency encoder settings: disable heavy lookahead, use faster presets, tune GOP (smaller GOP = fewer frames between keyframes → faster recovery and lower segment durations).
- Reduce frame batching and tune encoder bitrate buffers (CBR vs VBR tradeoffs).
- Consider hardware encoders (NVENC, QuickSync) for lower encode latency at scale.
Practical tips: set keyframe interval to match your segmenting strategy (e.g., 1s keyframes for sub‑second segments), and pick encoder presets that favour speed over compression when latency is critical.
2) Pick the right protocol
- RTMP: long used for ingest; low overhead but less suited for browser playback.
- WebRTC: built for real‑time, sub‑second latency, adaptive, and uses RTP/UDP with congestion control. Best for ultra‑low latency and interactive use cases.
- SRT / RIST: strong for contribution links (reliability over lossy networks) with low latency guarantees; UDP‑based with ARQ/FEC.
- Low‑latency HLS (LL‑HLS) / CMAF / DASH: bring down segment sizes and use chunked transfer to get lower latency with existing CDN stacks but typically a few hundred ms to a couple seconds.
Tradeoffs: WebRTC gives the lowest latency but is more complex to scale through traditional CDNs; chunked‑CMAF or LL‑HLS trades slightly higher latency for easier CDN compatibility and wider device support.
3) Use a low‑latency CDN and edge packaging
- Push processing to the edge: do packaging/transmuxing close to viewers to avoid extra round trips to origin.
- Use CDNs that support WebRTC or low‑latency HLS/CMAF (some CDNs provide edge WebRTC or chunked delivery).
- Avoid origin round trips per segment—use edge caching and prefetching to reduce RTT.
- Consider push vs pull strategies: pushing streams to many POPs reduces first‑viewer startup latency.
4) Adaptive bitrate (ABR)
- ABR keeps playback smooth as network conditions change. Use multiple encoded renditions (ladder) and a good player ABR algorithm.
- Ladder design matters: too many renditions increases ingest/packaging work; too few can cause stalls.
- For low latency, coordinate ABR switching with short segments or chunked segments so switches don't introduce long stalls or require long keyframe waits.
Practical ladder tip: maintain an overlap of keyframe boundaries across renditions so the player can switch quickly.
Tuning buffers, monitoring, and iteration
- Buffers to tune:
- Encoder buffer and keyframe interval
- Transport jitter buffer (at ingest and player)
- Player startup and rebuffer thresholds
- Monitoring & observability: track end‑to‑end latency, segment arrival times, encode time, packet loss, retransmits, rebuffer events, and viewer QoE metrics.
- Simulate network conditions (packet loss, bandwidth throttling, RTT) and run A/B experiments to measure changes.
- Instrument timestamps (clock sync) to measure true glass‑to‑glass latency and identify hotspots.
Interview checklist (what to say)
- Explain the pipeline and where latency comes from.
- Present the four levers (encode, protocol, CDN/edge, ABR) and why each matters.
- Discuss tradeoffs: latency vs scalability, complexity, and cost.
- Mention monitoring, buffers, and iterative testing.
Quick example summary you can say in an interview
"Latency comes from capture, encode, network, origin/CDN, and player buffering. To reduce it prioritize: 1) faster encoding (small GOP, low‑latency presets), 2) real‑time protocols like WebRTC or reliable UDP (SRT) depending on browser/device needs, 3) low‑latency CDN/edge packaging to avoid origin RTTs, and 4) ABR tuned for short segments. Then tune buffers, instrument end‑to‑end latency, and iterate under real network conditions."
That structure shows you understand both the components and the practical tradeoffs of building low‑latency live streaming.
Useful metrics to bring up
- Glass‑to‑glass latency (primary)
- Rebuffer rate and startup time
- Packet loss and FEC/retransmit rates
- Viewer bitrate distribution (ABR effectiveness)
- CDN origin vs edge latency

